
| 일 | 월 | 화 | 수 | 목 | 금 | 토 |
|---|---|---|---|---|---|---|
| 1 | 2 | 3 | 4 | 5 | 6 | 7 |
| 8 | 9 | 10 | 11 | 12 | 13 | 14 |
| 15 | 16 | 17 | 18 | 19 | 20 | 21 |
| 22 | 23 | 24 | 25 | 26 | 27 | 28 |
| 29 | 30 |
- 독립변수
- vsCode
- 픽셀
- wsl
- intervals
- click
- 2D
- 연습
- Quaternion
- topdown
- 탑다운
- Lerp
- classList
- 코딩
- addEventListener
- Event
- 종속변수
- jQuery
- euler
- 웹스크래핑
- 도린이
- 회전
- setItem
- Unity
- 자주 사용하는 Quaternion 함수
- PYTHON
- className
- getItem
- 도트
- javascript
- Today
- Total
쫑가 과정
플레이어 체력 설정 / 공격 맞기. 본문
오늘 결과.
1. 적 유닛과 부딪히면 체력이 닳게 만들어 보자.
구상
1. 공격을 맞으면 체력이 닳는 무적 시간을 갖는다.
2. 체력이 0이 되면 죽고 다시 시작된다.
3. 플레이어가 죽으면 적 유닛은 제자리로 돌아간다.
최대한 객체지향 프로그래밍 (4가지)을 연습하는 마음으로 작성했다.
1. 체력이 0이 되면 죽고 다시 시작
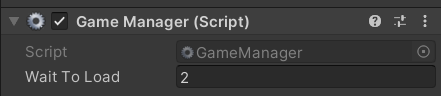
GameManager라는 스크립트 생성해 새로 만든 GameManager 오브젝트에 넣어줌.
using UnityEngine;
using UnityEngine.SceneManagement;

public class GameManager : MonoBehaviour
{
    private Movement playerScript;
    [SerializeField] float waitToLoad = 2f;
    private void Awake()
    {
        playerScript = GameObject.FindGameObjectWithTag("Player").GetComponent<Movement>();
    }
    void Update()
    {
        ReLoadScene();
    }
    // 플레이어가 죽음상태면 특정 시간 후 씬 재시작.
    private void ReLoadScene()
    {
        if (playerScript.isDead)
        {
            waitToLoad -= Time.deltaTime;
            if (waitToLoad <= 0)
            {
                SceneManager.LoadScene(SceneManager.GetActiveScene().name);
            }
        }
    }
}
2. Enemy와 Player가 상속할 Unit이라는 부모 클래스 생성.
Enemy와 Player 스크립트를 먼저 작성하고 공통되는 부분들을 따로 빼서 만들어도 된다.
using UnityEngine;

namespace AllUnits
{
    public class Unit : MonoBehaviour
    {
        // 플레이어와 적 유닛이 공통으로 사용할 변수
        [SerializeField] protected float speed = 3f;
        [SerializeField] internal float maxHealth = 50f;
        [SerializeField] internal float currentHealth;
        [SerializeField] internal float damage = 5f;
        [SerializeField] internal float damageDelay = 2f;
        private float initialDamageDelay;
        [SerializeField] protected bool isDamage = false;

        // 자식 클래스들도 사용될 수 있도록
        virtual protected void Start()
        {
            currentHealth = maxHealth;
            initialDamageDelay = damageDelay;
        }
        virtual protected void Update()
        {
            DamageDelay();
        }
        protected void DamageDelay()
        {
            if (isDamage && damageDelay > 0)
            {
                damageDelay -= Time.deltaTime;
                if (damageDelay <= 0)
                {
                    isDamage = false;
                    damageDelay = initialDamageDelay;
                }
            }
        }
    }
}
internal 같은 경우 원래 public인 보호 수준을 마지막에 namespace를 만들어 바꿔줌.
3. 플레이어 스크립트
새로운 스크립트 만들기 싫어서 움직임 스크립트에 추가함.
using UnityEngine;
using AllUnits;
[RequireComponent(typeof(Rigidbody2D))]
// Unit을 상속받음
public class Movement : Unit
{
    private Rigidbody2D playerRb;
    private Animator myAnim;

    // GameManager에서 가져가야 하므로 public이지만 수정불가능.
    public bool isDead { get; private set; } = false;

    private void Awake()
    {
        playerRb = GetComponent<Rigidbody2D>();
        myAnim = GetComponent<Animator>();
    }
    private void FixedUpdate()
    {
        float moveX = Input.GetAxisRaw("Horizontal");
        float moveY = Input.GetAxisRaw("Vertical");
        Vector3 moveVector = new Vector2(moveX, moveY);
        playerRb.transform.position += moveVector.normalized * speed *Time.deltaTime;
        myAnim.SetFloat("MoveX", moveX);
        myAnim.SetFloat("MoveY", moveY);
        if(Input.GetAxisRaw("Horizontal") == 1 || Input.GetAxisRaw("Horizontal") == -1 || Input.GetAxisRaw("Vertical") == 1 || Input.GetAxisRaw("Vertical") == -1)
        {
            myAnim.SetFloat("LastMoveX", Input.GetAxisRaw("Horizontal"));
            myAnim.SetFloat("LastMoveY", Input.GetAxisRaw("Vertical"));
        }
    }
    private void OnCollisionStay2D(Collision2D collision)
    {
    	// 적과 접촉하고 데미지입은 상태가 아니라면 데미지입는 상태가 켜지고
        // 적 공격력만큼 체력이 닳는다.
        if (collision.collider.tag == "Enemy" && !isDamage)
        {
            isDamage = true;
            float enemyAttack = collision.gameObject.GetComponent<EnemyController>().damage;
            currentHealth -= enemyAttack;
            // 체력이 0이거나 더 작아지면 죽음상태가 켜지고 게임오브젝트가 사라짐.
            if (currentHealth <= 0)
            {
                isDead = true;
                gameObject.SetActive(false);
            }
        }
    }
}
using AllUnits 을 사용해 internal을 받을 수 있게 한다. 혹은 Unit과 같은 namespace로 감싸준다.

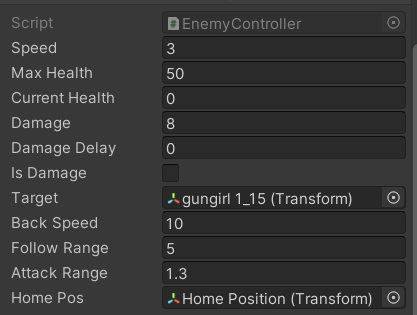
4. 적 스크립트 작성
이건 추후에 다른 적에 사용될 부모 클래스가 될 거다. 아직 상속을 하지 않으니 proteced를 걸지 않았다.
이전에서 추가된 건 상속 다형성인 override proteced 와 공격 조건인 && target.gameObject.activeSelf
using UnityEngine;
using AllUnits;

public class EnemyController : Unit
{
    [SerializeField] Transform target;
    // 돌아가는 움직임 속도.
    [SerializeField] float backSpeed = 10f;
    // 공격하기 위해 따라가는 범위
    [SerializeField] float followRange = 5f;
    // 따라감을 멈추고 공격하는 범위 안.
    [SerializeField] float attackRange = 1.3f;
    // 적이 되돌아가는 위치.
    [SerializeField] Transform homePos;
    private Animator anim;
    private float initialSpeed;
    private void Awake()
    {
        anim = GetComponent<Animator>();
        target = FindObjectOfType<Movement>().transform;
    }
    // override protected해줘서 Unit에서 사용된 메서드를 상속받아 다형성을 추가.
    override protected void Start()
    {
        base.Start();
        initialSpeed = speed;
    }
    override protected void Update()
    {
        base.Update();
        Movement();
    }

    private void Movement()
    {
        if (Vector3.Distance(target.position, transform.position) <= followRange && Vector3.Distance(target.position, transform.position) >= attackRange && target.gameObject.activeSelf)
        {
            speed = initialSpeed;
            transform.position = Vector3.MoveTowards(transform.position, target.position, speed * Time.deltaTime);
            anim.SetFloat("MoveX", target.position.x - transform.position.x);
            anim.SetBool("IsMoving", true);
        }
        else if (Vector3.Distance(target.position, transform.position) < attackRange && target.gameObject.activeSelf)
        {
            anim.SetBool("IsMoving", false);
            anim.SetFloat("MoveX", target.position.x - transform.position.x);
            anim.SetTrigger("Attack");
        }
        else
        {
            BackHome();
        }
    }
    private void BackHome()
    {
        anim.SetBool("IsMoving", true);
        anim.SetFloat("MoveX", homePos.position.x - transform.position.x);
        speed = backSpeed;
        transform.position = Vector3.MoveTowards(transform.position, homePos.position, speed*Time.deltaTime);

        if(Vector3.Distance(homePos.position,transform.position) == 0)
        {
            anim.SetBool("IsMoving", false);
        }
    }

}
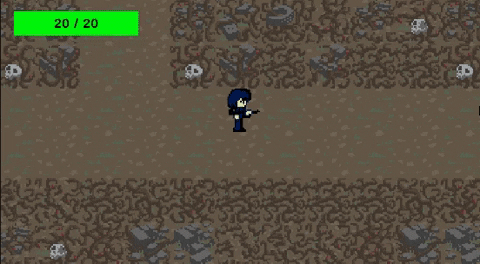
5. 체력 UI추가
일단 쉽게 상단에 UI를 고정시키자.
1. 생성


2. 위치
UI는 위치만 잘할 줄 알면 다 한 거다.
https://docs.unity3d.com/kr/530/Manual/UIBasicLayout.html
유니티 - 매뉴얼: 기본적인 레이아웃
기본적인 레이아웃 이 섹션에서는 Canvas 및 기타 요소와 상대적으로 UI 요소를 배치하는 방법을 살펴 보겠습니다. 이 섹션을 읽고 있는 동안 테스트 해보기를 원한다면, 메뉴에서 를 사용하여 Imag
docs.unity3d.com
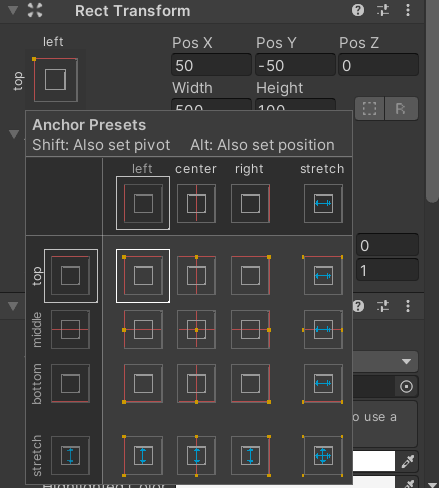
알트를 눌러서 변경하면 지정 위치 끝으로 이동한다.
3. 그럴싸하게 만들기.
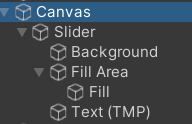
Background와 Fill 색상과 크기를 변경해 그럴싸하게 만든다.
Text-TextMeshPro를 추가해서 Text를 넣어준다. (그냥 Text보다 성능에 더 좋다.)

4. 작동할 수 있도록 스크립트 생성
Canvas에 넣어준다.
using UnityEngine;
using UnityEngine.UI;
using TMPro;

public class UIManager : MonoBehaviour
{
    [SerializeField] Movement playerScript;
    [SerializeField] Slider healthBar;
    [SerializeField] TextMeshProUGUI healthText;
    private void Update()
    {
        healthBar.value = playerScript.currentHealth;
        healthBar.maxValue = playerScript.maxHealth;
        healthText.text = $"{healthBar.value} / {healthBar.maxValue}";
    }
}
끝.
'Unity 따라 배우기 > Topdown 2D RPG In Unity' 카테고리의 다른 글
| 마무리 (0) | 2022.04.08 |
|---|---|
| 데미지 입는 효과 주기 / 캐릭터 깜빡이기 (0) | 2022.03.08 |
| 쉬운 적 AI 만들기 (설정 범위 내 공격, 범위 밖 설정 자리로 돌아감) (1) | 2022.02.24 |
| 쉽게 플레이어 맵 이동, 맵 변경 (0) | 2022.02.23 |
| 카메라 플레이어 부드럽게 따라가기, 카메라 경계 설정. (2) | 2022.02.22 |
| 2d 탑 다운 시점 캐릭터 8방향 움직임, 애니메이션 설정. (0) | 2022.02.18 |


